Best Practices On Agar Plate Handling
Agar plates are one of the most-used consumables in any microbiology lab and one of the most commonly wasted.

A batch poured on Monday can be cloudy, cracked, or contaminated by Friday if it isn’t stored correctly. Storage directly affects your results, getting it right saves money, reduces repeat work, and protects the integrity of your experiments.
This guide covers how long agar plates last, the conditions that extend their shelf life, and the warning signs that a plate should be discarded.
How Long Do Agar Plates Last?
Shelf life depends heavily on the medium and any additives.
As a general rule:
- Standard nutrient or LB plates: 2–4 weeks when refrigerated + sealed.
- Rich or selective media: often 2–4 weeks, sometimes less.
- Antibiotic plates: frequently the shortest-lived, because antibiotics degrade over time. Ampicillin plates, for example, are often considered reliable for only about a month, and some antibiotics lose potency faster.
Always validate shelf life for your specific media and workflow rather than assuming a fixed number of days. When in doubt, run a control plate to confirm selectivity and sterility before committing valuable samples.
The Right Storage Conditions
Store agar plates at 2 to 8 °C, typically in a dedicated lab refrigerator. Cold temperatures slow both moisture loss and microbial growth from any stray contaminants.

Never freeze agar plates! Freezing damages the gel structure of the agar, causing it to crack, weep, or separate from the plate surface once thawed. A frozen-and-thawed plate is rarely usable.
Store Agar Inverted
Always store plates upside down, with the agar on top and the lid on the bottom. This is one of the simplest yet most overlooked best practices.
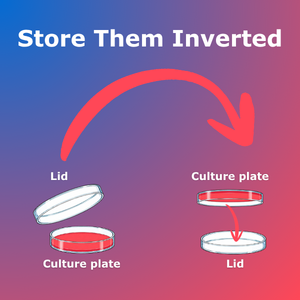
The reason is condensation. As plates cool, water vapor collects on the lid. If the plate is stored right-side up, those droplets fall onto the agar surface, creating a wet film that lets colonies smear together and spread. Storing plates inverted keeps condensation on the lid and away from your growth surface.
Avoid Moisture Loss
Agar is mostly water, and over time plates dry out. The medium shrinks, cracks, and pulls away from the edges.
Tips to slow this:
- Keep plates in the plastic sleeve they were poured or purchased in.
- Alternatively, stack them in a resealable bag.
- For longer storage, wrapping the plate edge with Parafilm reduces evaporation while still allowing easy access.
Sealing also adds a barrier against airborne contaminants in the fridge.
Protect Light-Sensitive Media
Some components, e.g. certain dyes, indicators, and antibiotics such as tetracycline degrade when exposed to light. Store these plates in the dark, either in an opaque bag or a covered box, to preserve their function.
Signs a Plate Has Gone Bad
Before using any stored plate, inspect it.
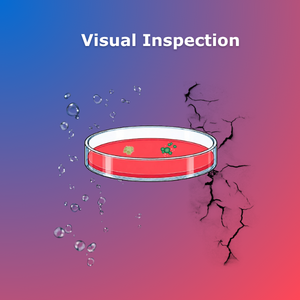
Discard plates showing:
- Contamination:
unexpected colonies, fuzzy mold, or hazy patches on the surface. - Excessive drying:
cracked agar, shrinkage, or the medium peeling from the edges. - Discoloration:
color changes that suggest degradation or contamination. - Heavy condensation
A few seconds of inspection is far cheaper than an experiment ruined by a compromised plate.
Bring Plates to Room Temperature Before Usage
Take plates out of the fridge and let them warm to room temperature before inoculating, usually 15–30 minutes, or longer for a full stack.
Warm plates prevent condensation from forming during incubation, and they promote more even, reproducible colony growth. Inoculating a cold plate straight from the fridge often leads to moisture problems and inconsistent results.
Label Your Plates
Good storage starts with good labeling. Mark each plate or stack with the medium, any additives, the date poured, and an expiry date. This makes first-in, first-out rotation easy and prevents anyone from unknowingly reaching for an expired batch.
Key Takeaways On Agar Handling
To get the most from every batch of agar plates:
- Store at 2–8 °C, never frozen.
- Keep plates inverted to avoid condensation on the agar.
- Seal in sleeves, bags, or Parafilm to prevent drying.
- Protect light-sensitive media from light.
- Inspect before use and warm to room temperature before inoculating.
- Label with contents and dates for easy rotation.
Small habits like these keep your plates viable longer, cut down on waste, and – most importantly – keep your results consistent and trustworthy.
CFU Counting
If you are looking for more tips or free software you can check out this post about CFU colony counting.
Automated Colony Counting
Automate your lab processes directly on your phone, laptop or tablet with our counting solution. Read more here.